|
|

|
Material
Plugin Alien Skin Eye Candy 5: Impact/ Plugin Flaming Pear/ Flood Plugin Carolaine and Sensibility/ CS-DLines Plugin VM Natural/ Marble Madness Fonte Efeitos do PSP X2
Roteiro
Radial / A=45 / R=30, Center Point: 50 / 50 / Invert desmarcado.
06. Abra uma imagem transparente 700 X 550.
07. Preencha com o gradiente.
08. Ative a ferramente Selection e configure em Circle.
09. Fazendo centro no centro da layer (x=350 / y=225) trace uma circunferência que vá até uns 30 px das bordas inferior e superior da layer, Veja o print:
10. Selections / Invert.
11. Edit / Cut.
12. Selections / Select None.
13. Ainda com a ferramenta Selection configurada em circle, com centro no mesmo ponto do item 09, trace um segundo círculo para obter um anel de uns 10px de expessura (veja o print)
14. Edit / Cut e não tire a seleção.
15. Ative seu tube de paisagem,
16. Edit / Copy.
17. Layers / New Raster Layer.
18. Layers / Arrange / Send to Bottom.
19. Edit / Paste into Selection.
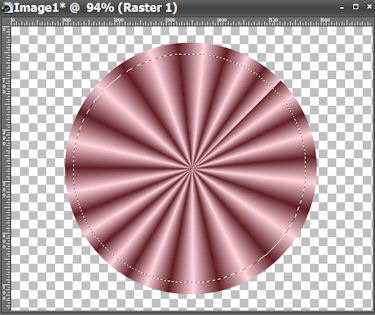
20. Selections / Select None.
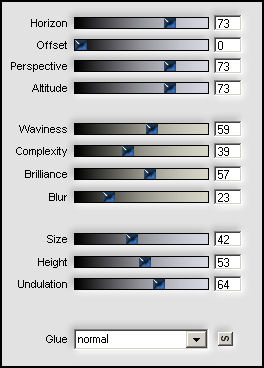
21. Effects / Plugin Flaming Pear / Flood como no print:
22. Ative a layer do anel.
23. Effects / Plugin Alien Skin Eye Candy 5: Impact / Glass, numa configuração à sua escolha.
24. Layers / New Raster Layer.
25. Layers / Arrange/ Send to Bottom.
26. Pinte com um gradiente formado pelas mesmas cores e configurado: Linear, A=0 / R=1 / Invert desmarcado.
27. Effects/ Plugins / Carolaine and Sensibility / CS-DLines com os valores: 40/ 81.
28. Layers / Merge / Merge Visible.
29. Image / Resize 75% com: Lock aspect ratio marcado e Resize all layers desmarcado.
30. Layers / New Raster Layer.
31. Layers / Arrange / Send to Bottom.
32. Pinte com o gradiente formado por último (Linear, A=0 / R=1).
33. Selections / Select All.
34. Edit / Paste into Selection (o tube da paisagem ainda está na memória).
35. Effects / Plugin Flaming Pear / Flood como no item 21.
36. Sem tirar a seleção, ative a layer superior (Layer Merged).
37. Selection / Float.
38. Selection / Defloat.
39. Selections / Modify/ Select Selection Borders com: Both Sides e Anti alias marcados e Border Width=4.
40. Layers / New Raster Layer.
41. Pinte com o mesmo gradiente, agora com Invert marcado.
42. Selections / Select None.
43. Effects / Plugins/ VM Natural / Marble Madness configurado: 9 / 22 / 105 / 255.
44. Layers / Merge / Merge Visible.
45. Selections / Select All.
46. Selections / Modify/ Contract: Number of pixels=10px.
47. Layers / New Raster Layer.
48. Selections / Invert.
46. Pinte com o útimo gradiente usado.
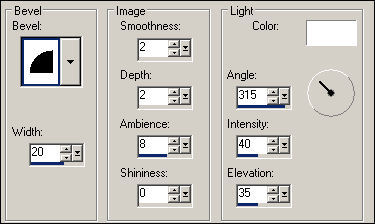
50. Selections / Select None.
51. Effects / 3D/ Inner Bevel como no print (preset Almofada):
52. Ative seu tube principal.
53. Edit / Copy.
54. Edit / Paste as a New layer na tag, em primeiro plano.
55. Dê resize se necessário e posicione a gosto.
56. Drop Shadow a gosto.
57. Layers / New raster Layer.
58. Ative a ferramenta Texto.
59. Escreva seu texto (cor, fonte, tamanho e posição a seu gosto).
60. Layers / Merge / Merge All.
61. Assine.
62. Salve.
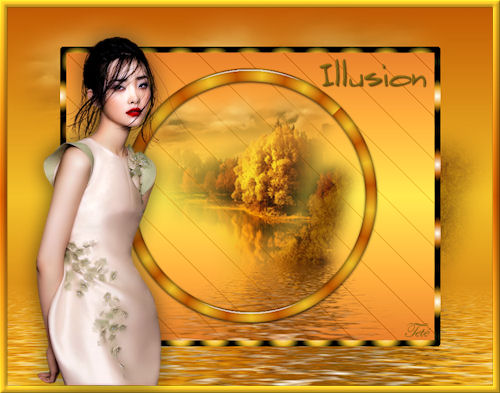
Modelo 1:
Modelo 2:
Créditos Tube: Guismo (paisagem), Animabelle (feminino) Modelos Tube: Guismo (paisagem), Cibi (feminino) Tubes: Nikita (paisagem), Gabry (feminino
Tutorial criado por Tetê Samuel em 22 de outubro de 2015 sendo proibida sua divulgação sem o prévio consentimento da autora.
|