|

This tutorial comes from Tetê Samuel, whom I thank
for letting me translate her tutorials.
*
Original here

*
Tubes

*
Material

> You will need a tube character
*
Plugins
Mock / Mosaic
Mehdi / Sort Tiles
Simple / Zoom Out and Flip
FM Tile Tools / Mix relief
Toadies / What are you?
AP[Lines] / Lines - SilverLining
Andrew's Filter Collection 59 / Enter and exit filters
Blur / TransBlur
AAA Frames / Photo Frame
You can find these plugins on the websites of:
Renée
Cloclo
SCRIPT
1.
Open the material on the psp / Duplicate (shift+d) / Close the
original
Choose two colors from your tube and put a dark color in the
foreground and a dark color in the background
2.
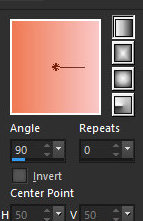
Prepare a Linear gradient
Open a new transparent image with 800x600px
3.
Paint the image with the gradient
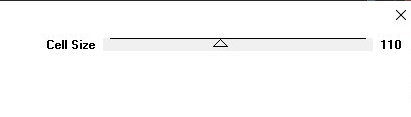
Effects / Plugins / Mock / Mosaic
4.
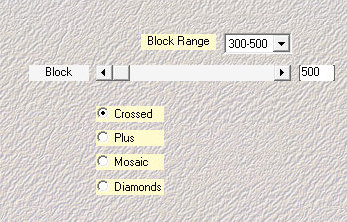
Effects / Plugins / Mehdi / Sorting tiles
Effects / Plugins / Simple / Zoom out and Flip
5.
Layers / Duplicate
Image / Mirror / Vertical mirror (flip)
6.
Layers / Properties / Blend mode: Lighten
Merge down
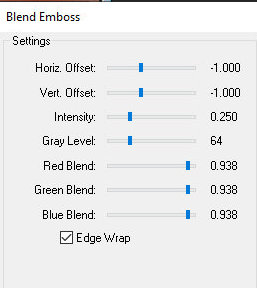
7.
Effects / Plug-ins / FM Tile tools / Blend Emboss
Effects / Plugins / Toadies / What are you?
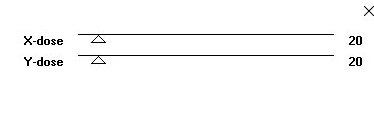
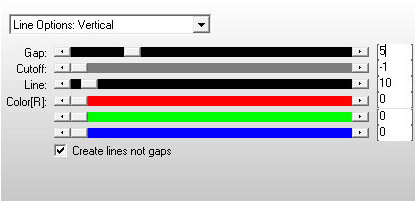
8.
Effects / Plugins / AP [Lines] / SilverLining
Effects / Plugins / Simple / Zoom Out and Flip
9.
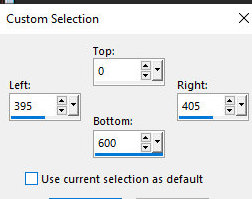
Activating a selection tool / Custom selection and configuration
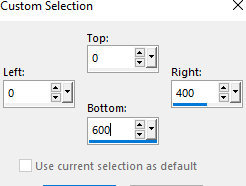
Selections / Promote selection to layer
10.
Select none
Image / Mirror / Mirror horizontal (Mirror)
11.
Merge down
Activate the selection tool / Custom selection and configure
12.
Selections / Promote selection to layer
Do not select
13.
Effects / Plug-ins / Andrew's Filter Collection 59/ Collection
filters 59 / Ind and Out of Filters
Layers / Duplicate
14.
Merge down
Layers / Duplicate
15.
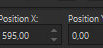
Activate the selection tool and set it up: X=595 / Y=0
Layers / Duplicate
16.
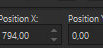
Activate a selection tool and set: X=794 / Y=0
Merge down
17.
Layers / Duplicate
Image / Mirror / Mirror horizontal
18.
Merge down - 2 times
Copy the tube deco [element_deco] and paste it as a new layer
19.
Layers / Properties / Blend mode: Hard Light
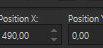
Activate the pick tool and set: X=490 / Y=0
20.
Layers / Duplicate
Activate the pick tool and set: X=685 / Y=100

21.
Merge down
Layers / Duplicate
22.
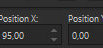
Activate a selection tool and set it up: X=95 / Y=0
Merge visible
23.
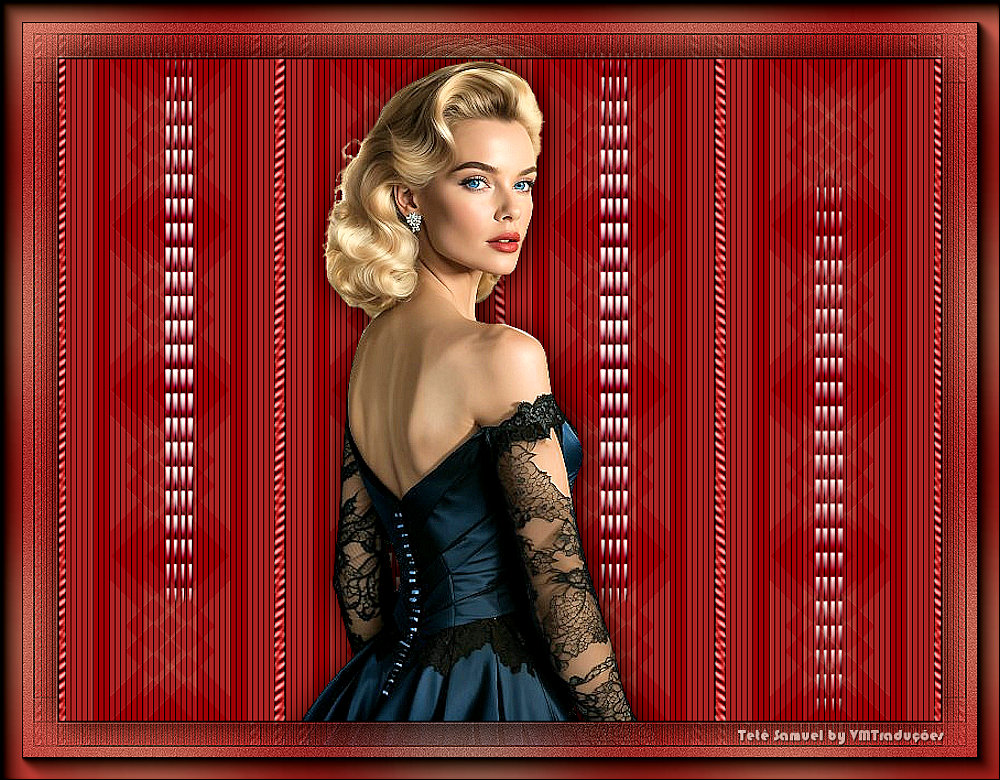
Copy your tube character and paste it as a new layer
Make the necessary adjustments (resize/sharpen/shadow/position etc)
24.
Image / Add borders / 2px / black
Image / Add borders / 50px / white
25.
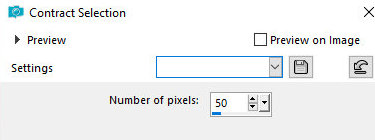
Selections / Select all
Selections / Modify / contract=50
26.
Selections / Invert
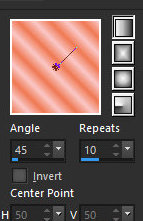
Prepare this Linear gradient
27.
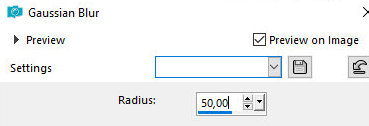
Paint the selection with this gradient
Adjust / Blur / Gaussian Blur=50
28.
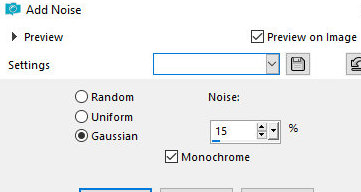
Adjust / Add/Remove Noise / Add Noise
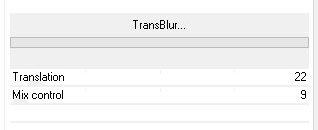
Effects / Plugins / Blur / TransBlur
29.
Effects / Edge Effects / Enhance
Selections / Invert
30.
Drop Shadow: 0 0 80 40 black
Select none
31.
Image / Add borders / 2px / black
Image / Resize: 800x600px
32.
Adjust / /sharpness / Sharpen
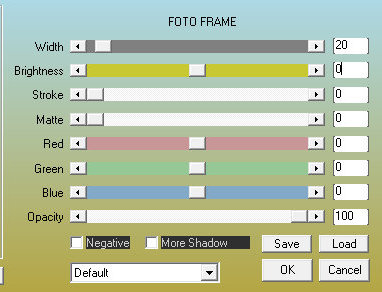
Effects / Plugins / AAA frames / Photo Frame
33.
Adding signatures
Merge all
Save as jpeg
*
Tutorial traduzido em
23/08/24
*
 |